Wednesday, April 25, 2018

New SQL Operations Studio Installation and Overview

https://www.mssqltips.com/sqlservertip/5339/new-sql-operations-studio-installation-and-overview/
Problem
SQL Server Management Studio is used as the default tool to connect to different SQL Server versions to manage SQL Server. Prior to SQL Server 2017, SQL Server Management Studio was only on the Windows platform. Microsoft recently launched a preview version of Microsoft SQL Server Operations Studio that runs on Windows, macOS, and Linux for SQL Server, Azure SQL Database, and Azure SQL Data Warehouse. In this tip, we will get an overview of SQL Operations Studio.
Solution
SQL Operations Studio is a free, light-weight tool for developers and administrators for SQL Server on Windows, Linux and Docker, Azure SQL Database and Azure SQL Data Warehouse on Windows, Mac or Linux machines. SQL Operations Studio is built on top of Visual Studio Code with the objective to make it highly extensible. It’s built on an extensible microservices architecture and includes the SQL tools service built on .NET Core.
SQL Operations Studio allows users to run command line tools such as PowerShell, BCP, SSH, Bash, etc. in the integrated terminal window inside the interface. It is also quite easy to view, generate and modify scripts with smart T-SQL code snippets and a rich graphical interface for database objects. DBAs can create customizable dashboards for monitoring which improves efficiency and quick turnaround for performance issues.
Before we move further, let's see how to install SQL Operations Studio.

SQL Operations Studio installation

SQL Operations Studio is currently in the January Public Preview. As mentioned earlier, SQL Operations Studio can be installed on Windows, Linux, MacOS as well. In this demo, we will have a look at the Windows version. You can find details for other OS installations in the Next Steps section.
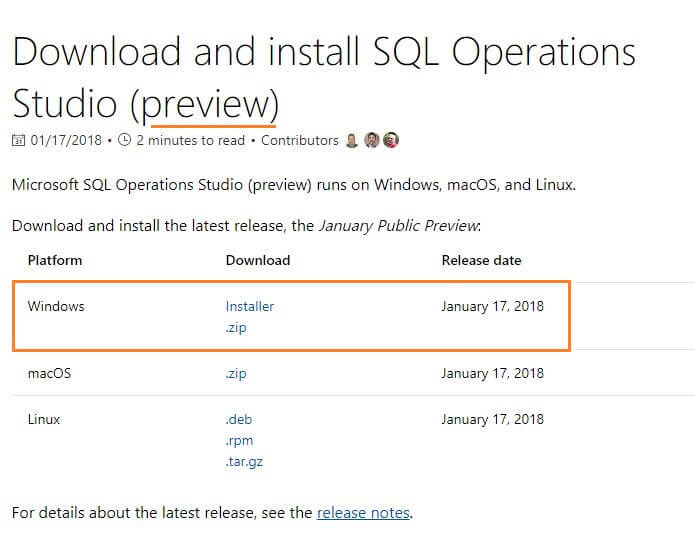
Download the Windows installer from this link SQL Operations Studio (preview) installer for Windows.
Microsoft SQL Operations Studio Installable software
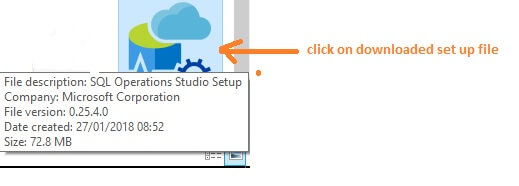
I have downloaded the Windows version for SQL Operations Studio and clicked on it to start the installation.
Microsoft SQL Operations Studio Installation
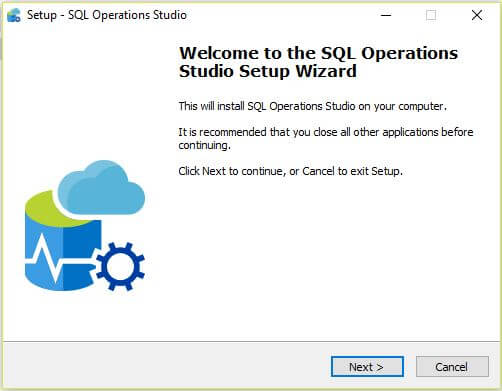
Click on the installation file to launch the setup process.
 SQL Operations Studio Installation
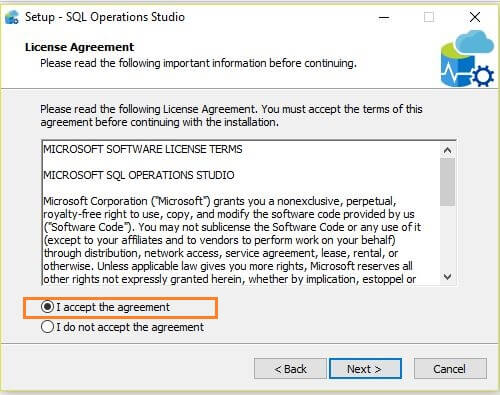
In next screen, accept the license agreement and click next.
Microsoft SQL Operations Studio Installation agreement accept
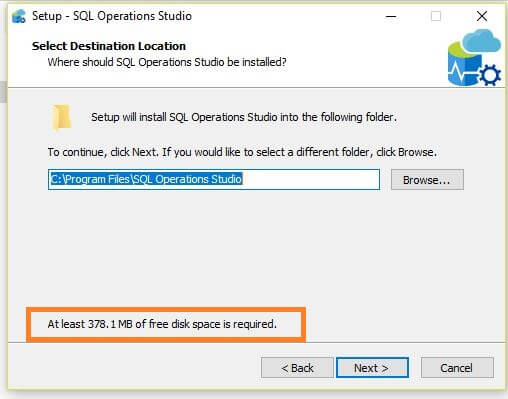
Select the SQL Operations Studio installation path, by default it will go to C:\program files\SQL Operations Studio.
Microsoft SQL Operations Studio Installation location
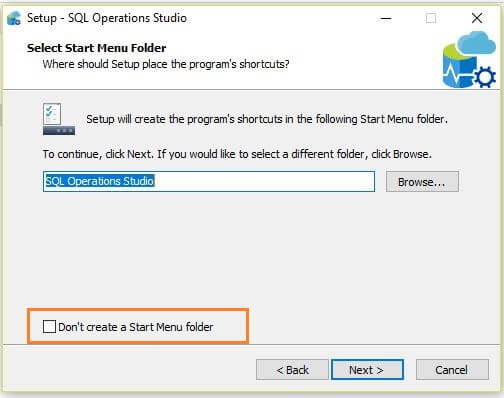
Select the Start Menu folder for SQL Operations Studio. If you don't want to create a start menu folder, click on the checkbox 'Don't create a Start Menu folder'.
Microsoft SQL Operations Studio Installation start menu folder
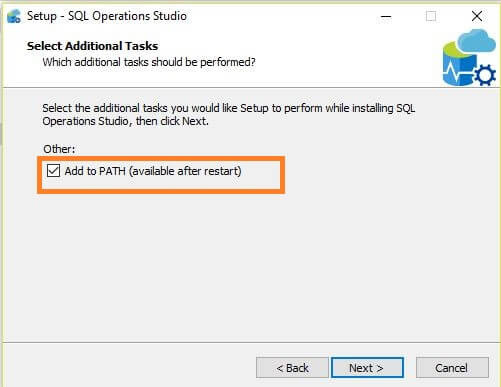
In the next screen, it will add the SQL Operations Studio folder path to the environment variable PATH. Please note that this will be available after system restart.
Microsoft SQL Operations Studio Installation PATH
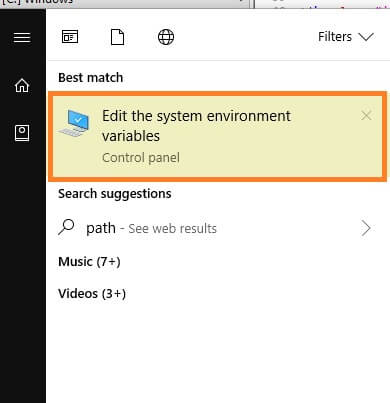
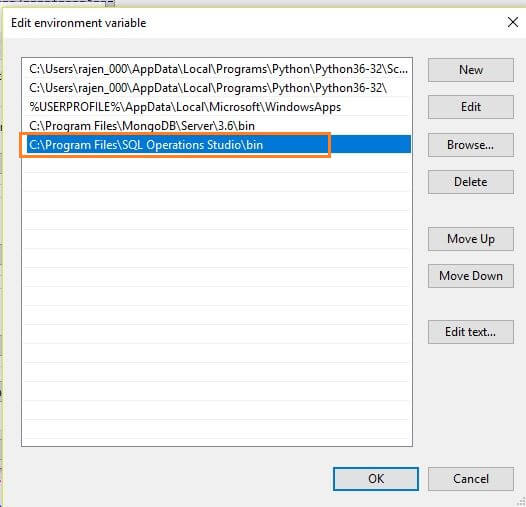
To see the PATH setting, go to Edit the system environment variables.
Microsoft SQL Operations Studio Installation PATH view
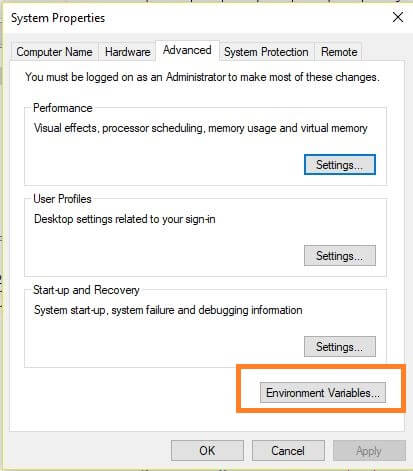
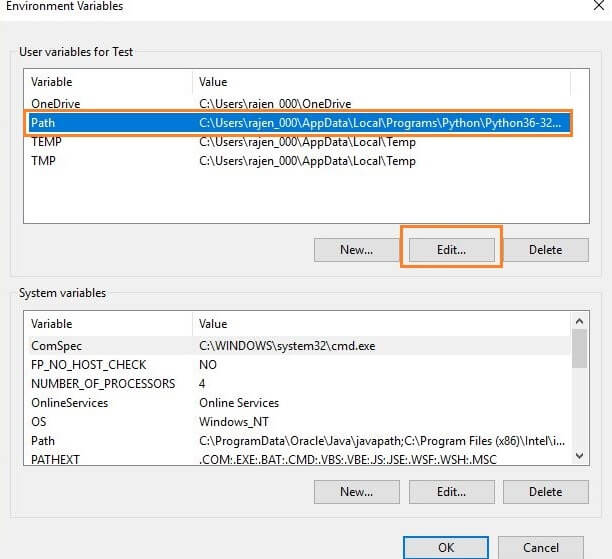
It opens the system properties windows as shown below. Click on Environment Variables and edit the PATH variable.
Microsoft SQL Operations Studio Installation PATH view
You can see the SQL Operations Studio folder path in the PATH variable and then click OK.
Microsoft SQL Operations Studio Installation PATH view
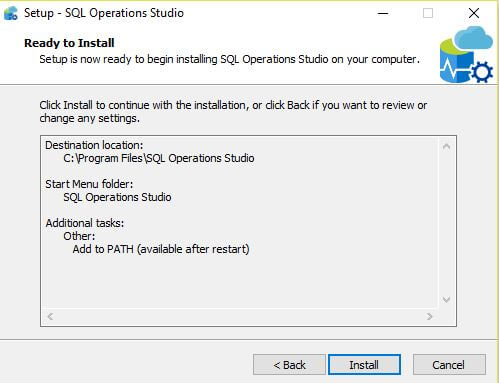
Now click on Next and you can see the settings, go back if you want to change any setting. Click on Install to start the installation process.
Microsoft SQL Operations Studio Installation review
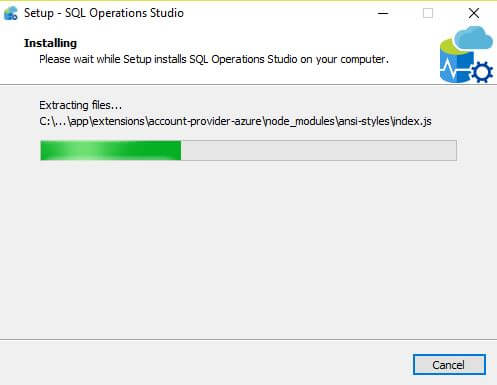
Set up is now starting the install.
Microsoft SQL Operations Studio Installation PATH view
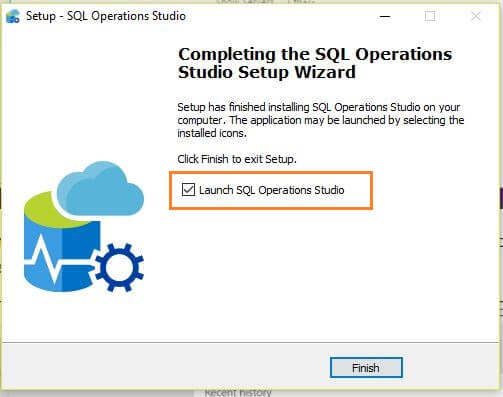
Once set up is finished, by default, it will launch SQL Operations Studio.
Microsoft SQL Operations Studio launch

Overview of SQL Operations Studio

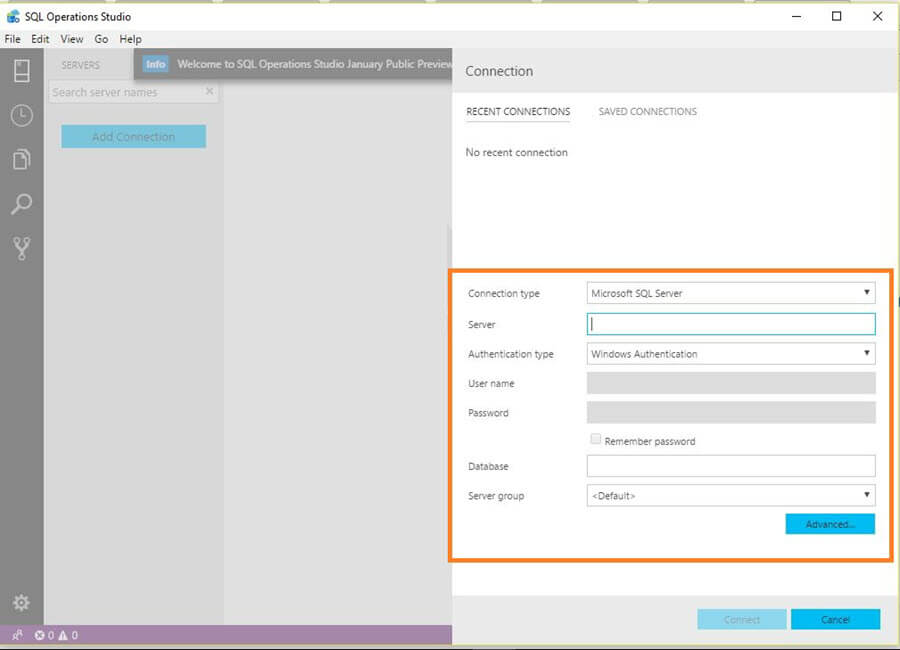
Once the installation is complete, we are now able to connect to SQL Server. The initial screen of SQL Operations Studio looks like the below image.
Microsoft SQL Operations Studio launch screen
Fill out the connection information and click Connect. Unlike other tools, this version doesn't provide a dropdown list of databases, so if we want to connect to a specific database, we can type the database name in the database name field.
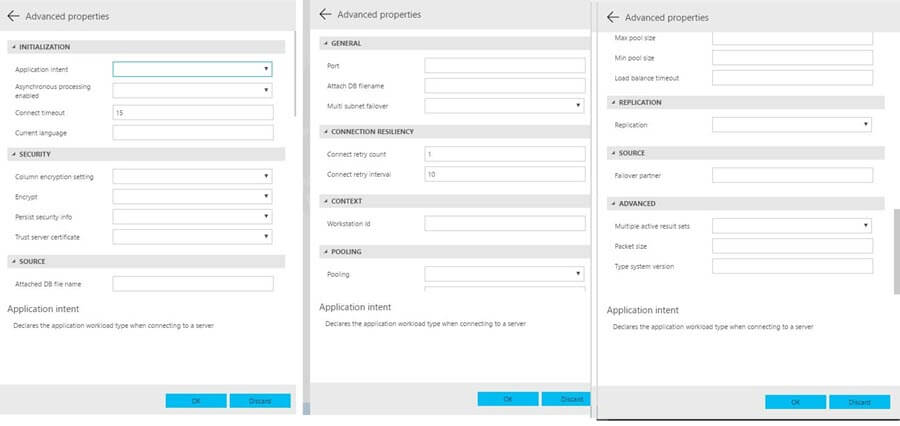
We can also click on Advanced to configure more connection options such as timeout, encrypt connection, port number, connection pooling, failover partner, etc.
Microsoft SQL Operations Studio launch screen
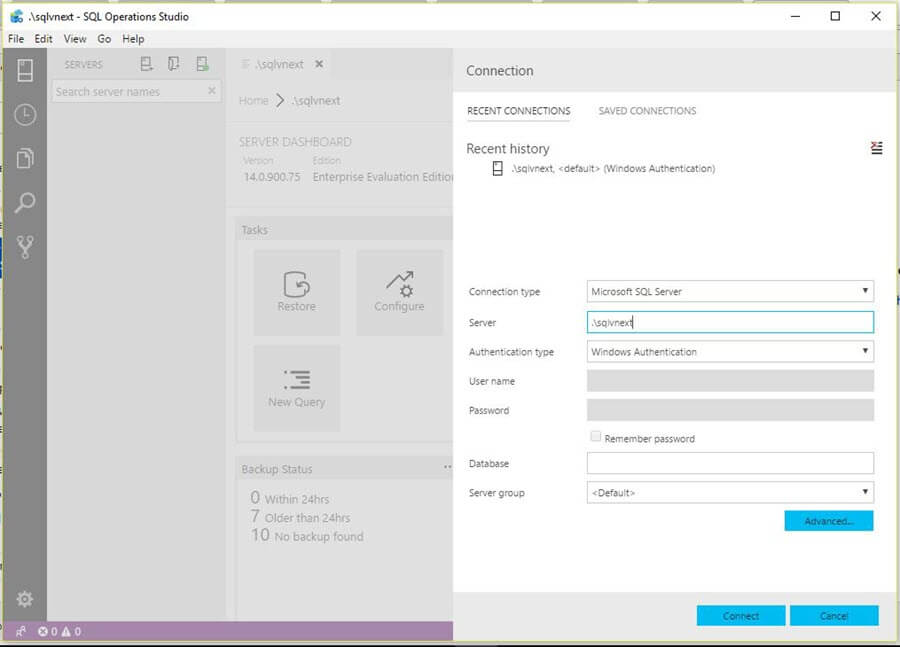
I have filled out the basic details like server name, authentication method as Windows authentication. In my case, I don't want to connect to a specific database, so I have kept it blank.
Microsoft SQL Operations Studio launch screen
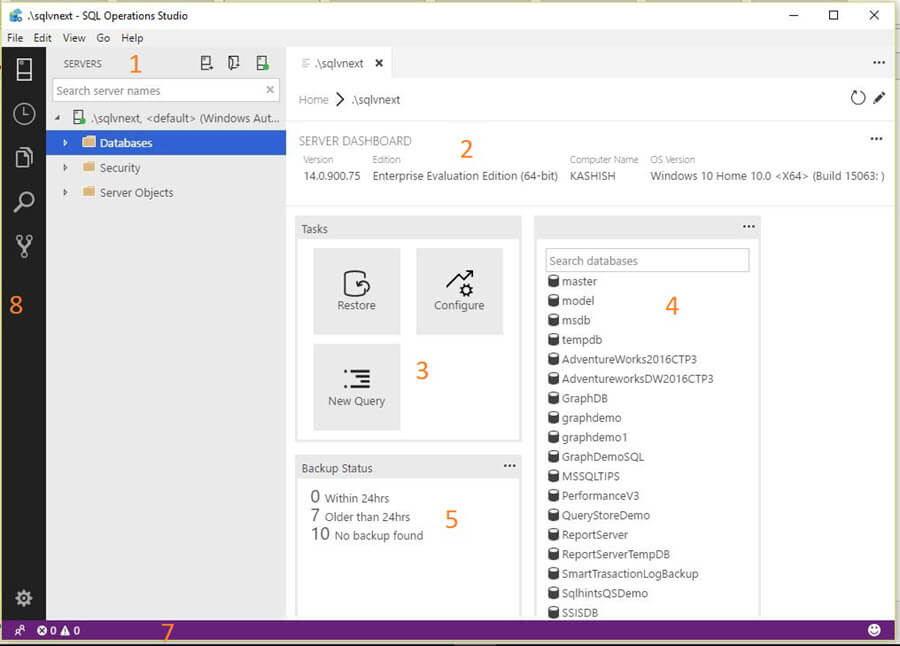
Once connected to the server, we can see the layout of SQL Operations Studio as below. I have numbered different areas of SQL Operations Studio to explain further below.
Microsoft SQL Operations Studio layout
Microsoft SQL Operations Studio layout section

(1) Object Explorer

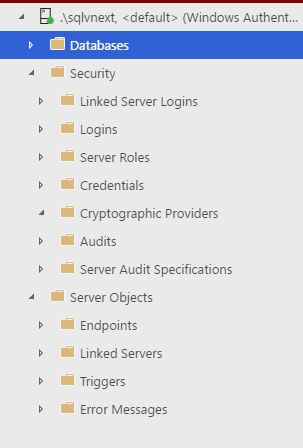
This area shows the servers pane where all the server connections will be listed. We can expand the server similar to SSMS and can view databases (tables, schemas, views, functions, stored procedures, etc.), Security (logins, credentials, audits, linked servers logins, server roles, etc.) and Server Objects (endpoints, triggers, linked servers, etc.).
Microsoft SQL Operations Studio object explorer
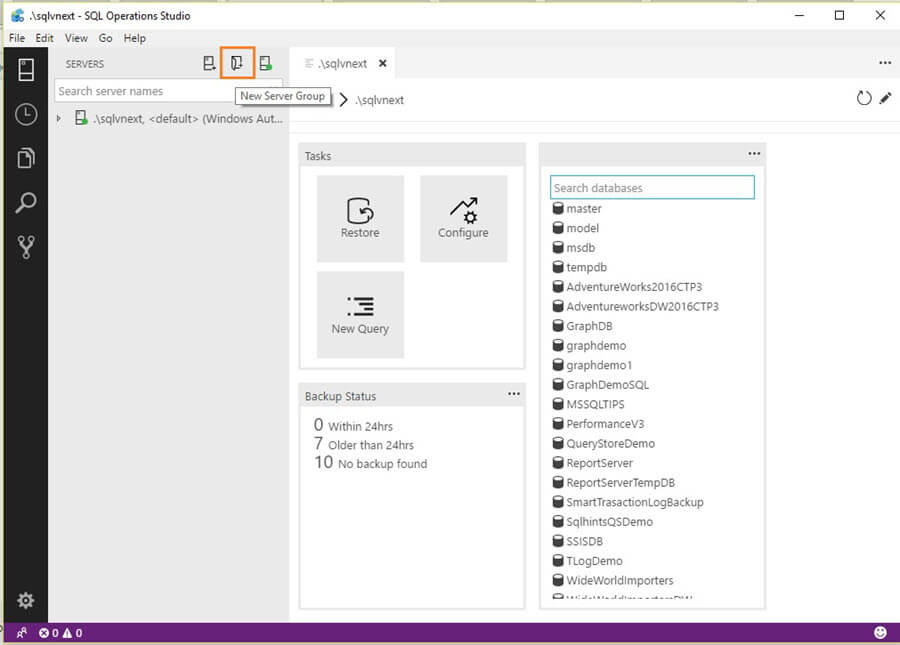
We can also create groups for the servers.  One example is to group servers according to their roles production, QA, UAT, Dev, etc.
Click on the new server group.
Microsoft SQL Operations Studio new server group
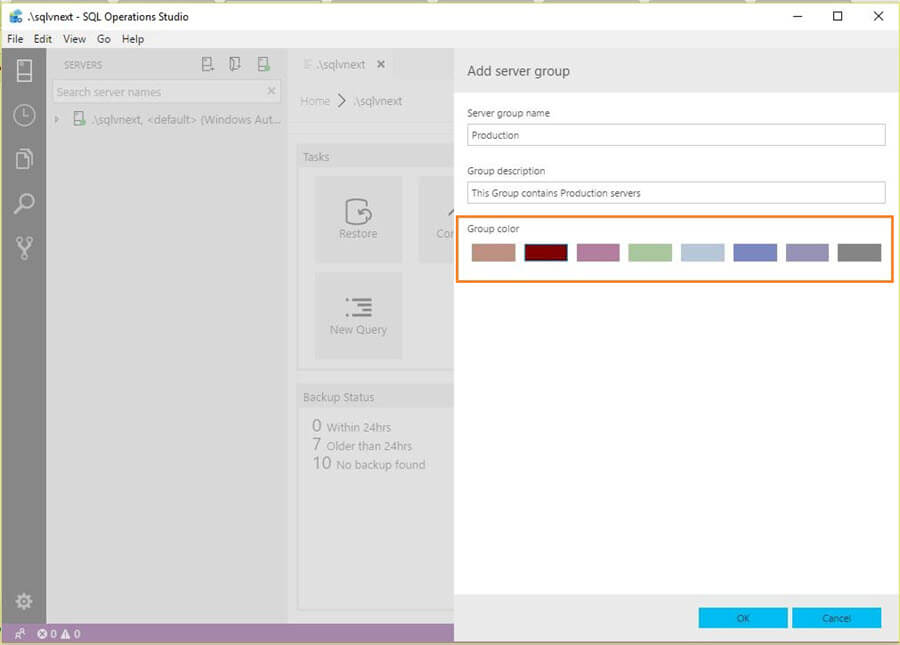
It opens a window to define the server groups and also we can choose the group color as well. This makes it easy to identify the server group based on the color code as well
Microsoft SQL Operations Studio group color and details
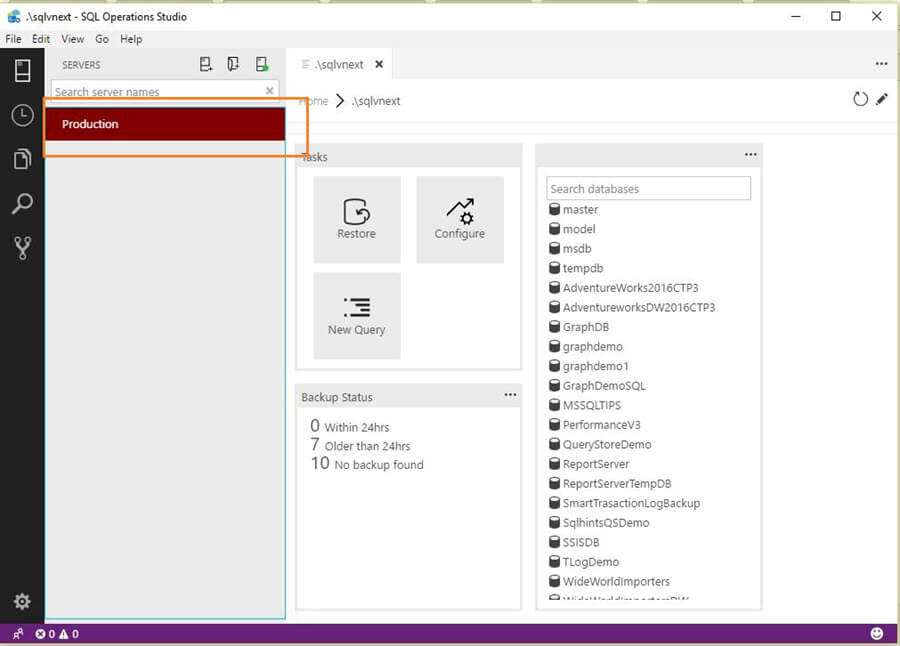
We can see below that the group is highlighted with the color we choose while creating it.
Microsoft SQL Operations Studio group details
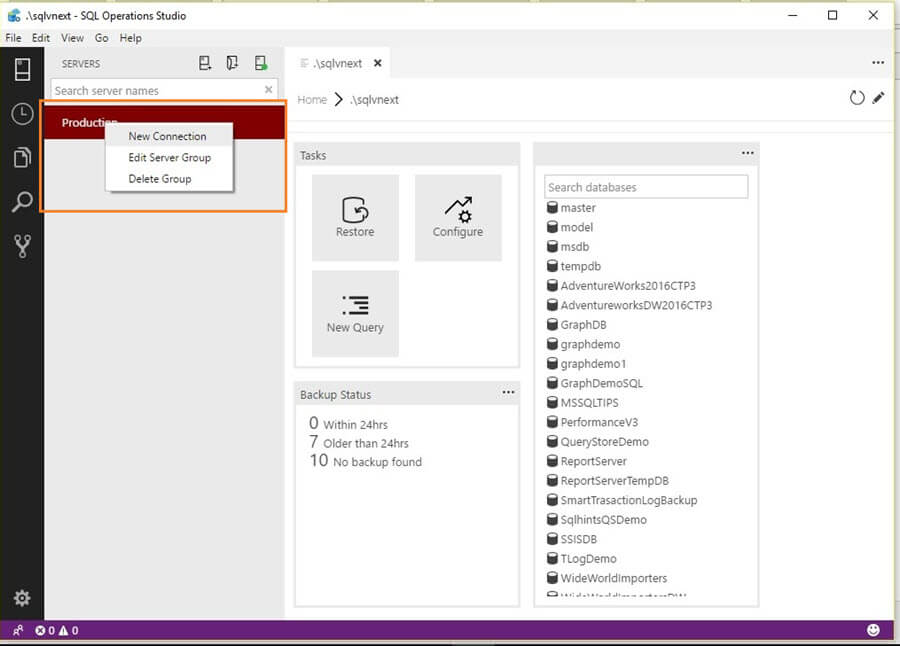
Now we can add the servers in their respective group by right click on group name followed by the new connection.
Microsoft SQL Operations Studio add servers in group
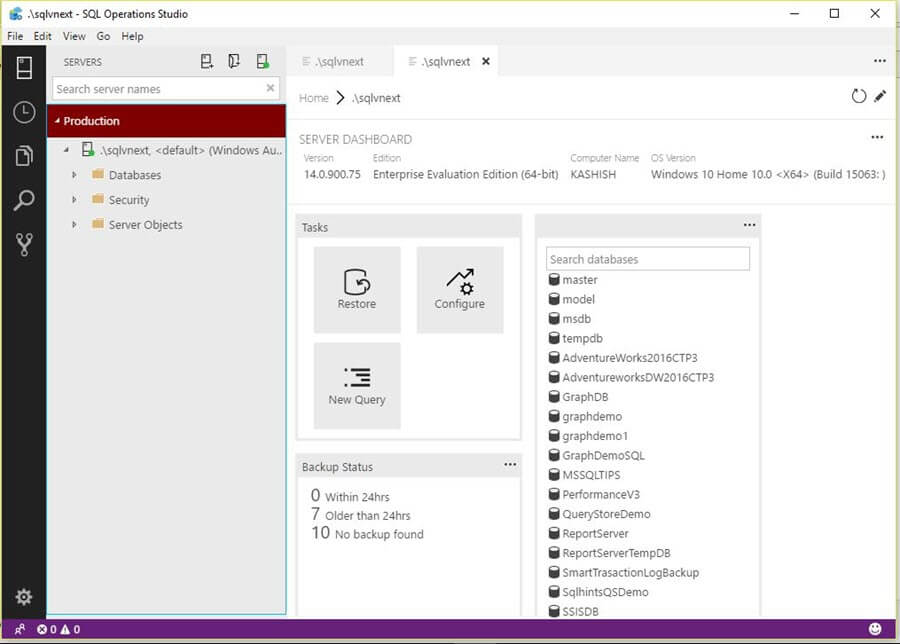
Fill out the connection details and server will be listed under the group.
Microsoft SQL Operations Studio server group connections

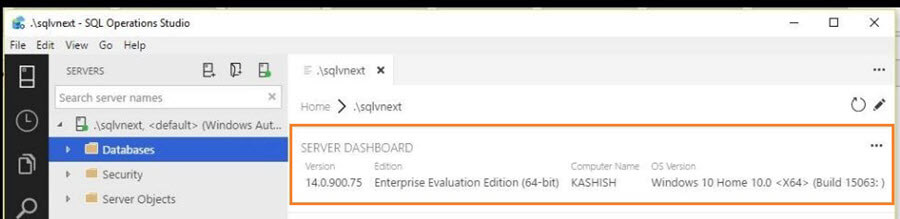
(2) Server Dashboard

Server Dashboard gives information about connected servers such as SQL Server Version, Edition, Computer Name and Operating System Version.
Microsoft SQL Operations Studio server dashboard

(3) Common Tasks

This area shows the common tasks to be performed. These common tasks are:
  • Restore: Shortcut to launch a database restore
  • Configure: Shortcut to configure your server. We will explore this with my future tips.
  • New Query: To run a query, perform query analysis including execution plan overview, etc.

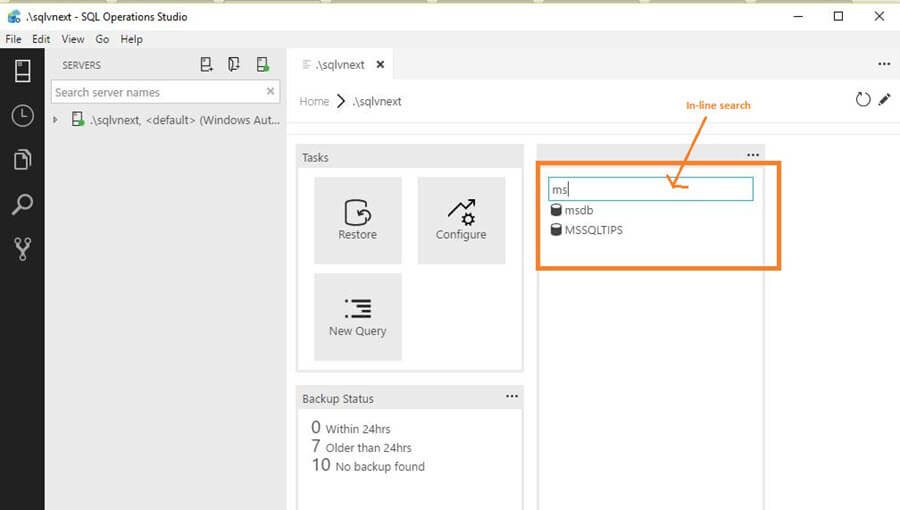
(4) Search Pane

This section provides a easy way to find database objects from the list of databases. We can simply start typing and it narrows down the database objects to match what was typed.
Microsoft SQL Operations Studio search
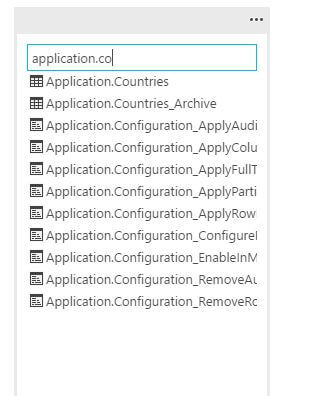
If we are connected to a specific database, we can search objects such as tables, stored procedures, etc.
Microsoft SQL Operations Studio search objects

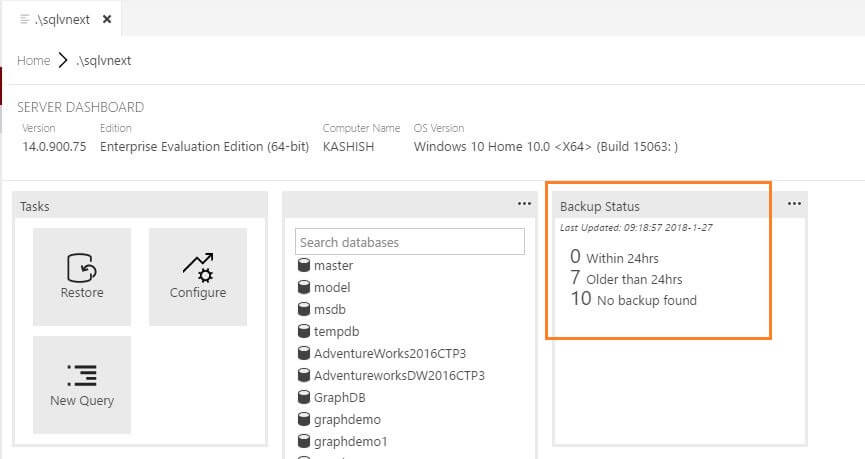
(5) Backup Status

This section provides backup status for the databases on the connected server. This is also very helpful information where we can quickly view the backup stats as:
  • How many backups completed in last 24 hrs
  • How many database backups are more than 24 hrs old
  • How many databases for which no backups are present
Microsoft SQL Operations Studio layout

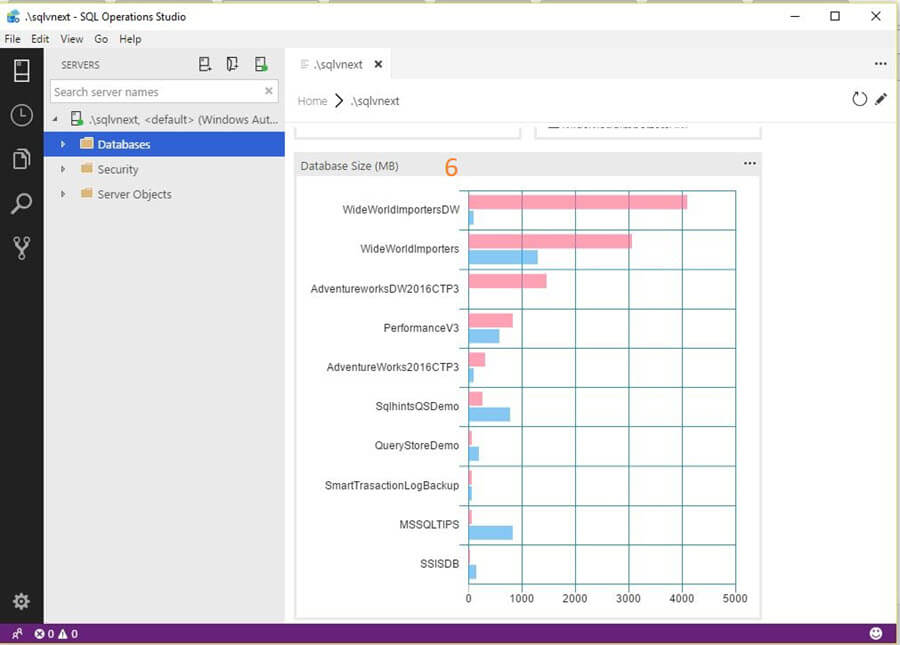
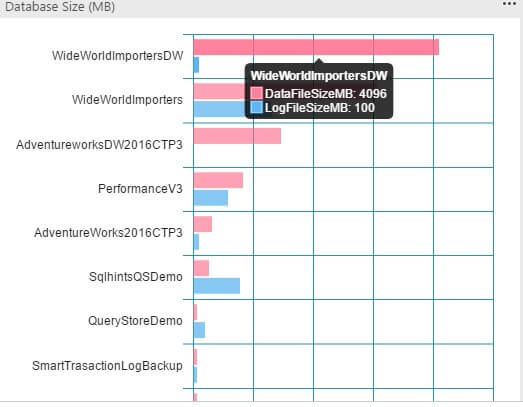
(6) Database Size Graph

This section provides a glance of sizes of various databases individually for the database and transaction logs file size.
Microsoft SQL Operations Studio >DB Size graph
This shows a graphical representation of the data file and log file space. If we hover the mouse over the graph on a particular database, it shows the file sizes for that database.
Microsoft SQL Operations Studio >DB Size

(7) Status Bar

This status bar is an interactive status bar to display a handful of information along with some relative information.
Microsoft SQL Operations Studio Status bar
Below we can see the information, options in the status bar are:
  • Managed linked account: If we are connecting with Azure, it shows the account information and also we can add the account here as well.
  • Problems: If any problems occur such as a syntax error, execution error, etc. it will be noted here.
  • Connection information: Connection information such as server name and database name.
  • Cursor position: Shows the cursor position. Clicking on the current cursor position takes us to the specified line in the opened file.
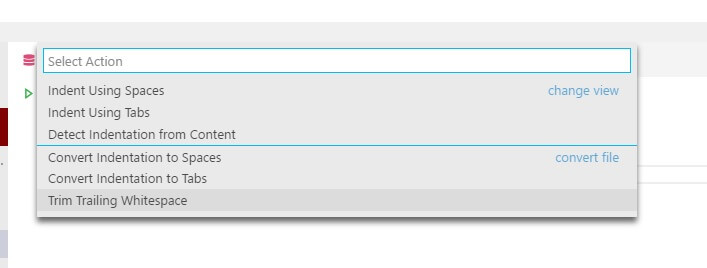
  • Indentation: Indentation can be changed to spaces or tabs. Clicking on Indentation opens up the below window and we can change Indentation from the list of options provided.
Microsoft SQL Operations Studio Indentation
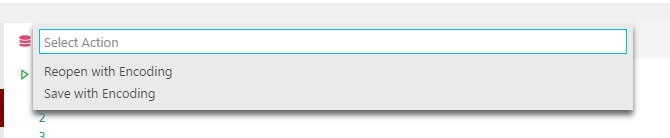
  • Encoding: We can also view and change the encoding from here. Clicking on encoding provides an option to reopen or save with encoding.
Microsoft SQL Operations Studio Encoding
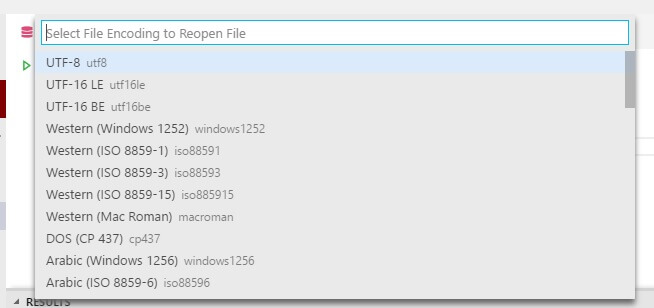
If we click on Reopen with Encoding, it provides a list of encoding options.
Microsoft SQL Operations Studio Reopen with encoding
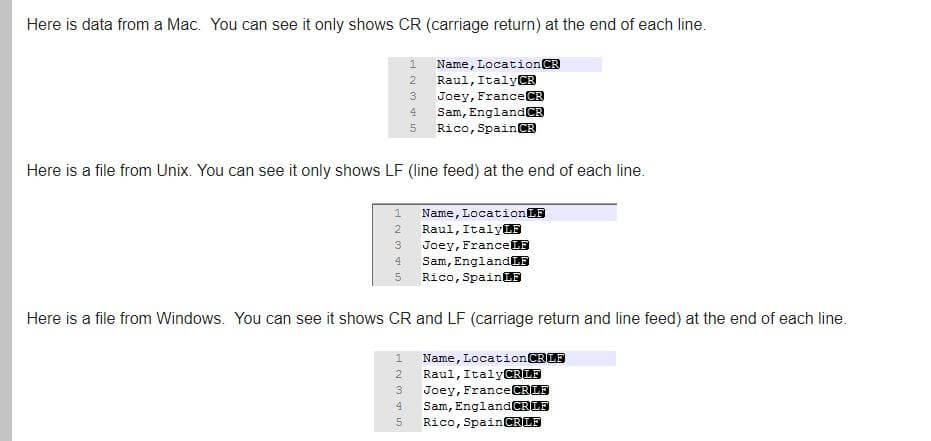
  • End of Line Sequence: We can change the End of Line sequence to either LF or CRLF. You can read this tip for more about End of Line sequence.
Microsoft SQL Operations Studio End of Line sequence
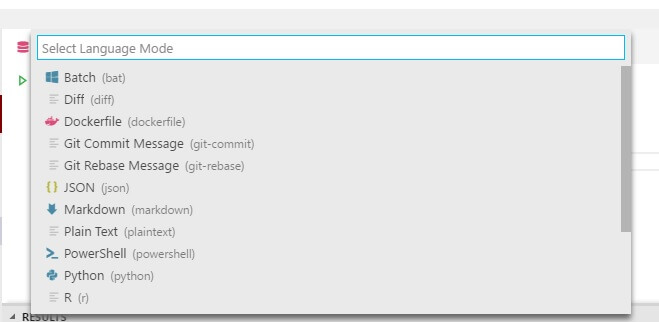
  • Language Mode: We can select from a list of different language options. By default, it is set to SQL.
Microsoft SQL Operations Studio Lanuage mode
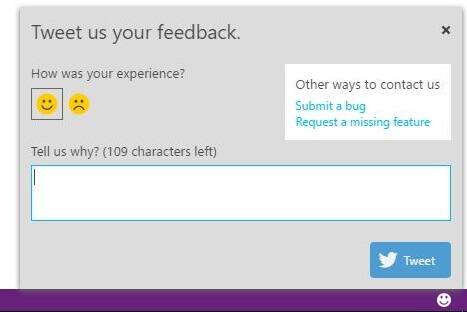
  • Tweet feedback: Smiley face at the end provides you a possibility to quickly tweet feedback.
Microsoft SQL Operations Studio Tweet feedback

(8) Activity bar

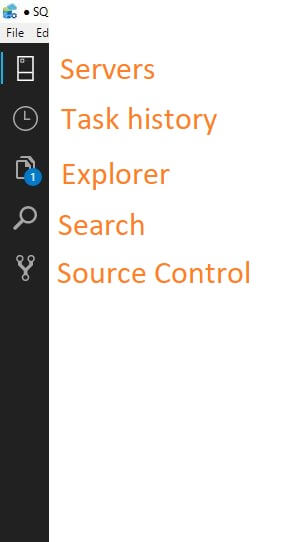
The activity bar contains multiple tabs as shown below.
Microsoft SQL Operations Studio Activity bar
  • Server Panel: Displays the servers group and servers listed.
  • Task History: If we performed any activities such as backups, restores or other similar tasks, it shows the history of those tasks.
  • Explorer pane: The Explorer Pane contains a list of all open files in the editor. If we have any unsaved files as well, it highlights them so that we can save them, if required.
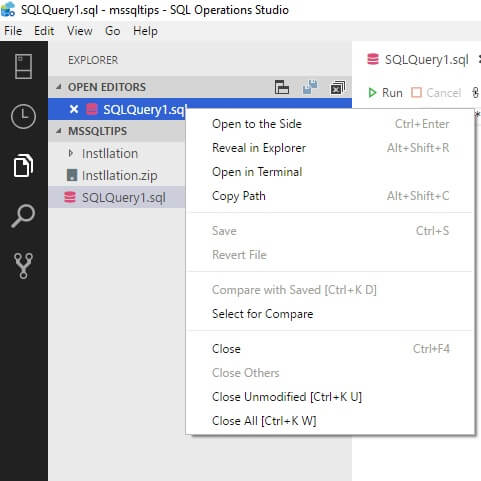
If we right click on the file name, it provides a list of options:
  • Reveal in Explorer opens up an Explorer window.
  • Open in Terminal opens up a terminal window in the lower half of the SQL Operations Studio, by default it is PowerShell, but we can also change to a Command Prompt or a BASH terminal.
Microsoft SQL Operations Studio options explorer pane
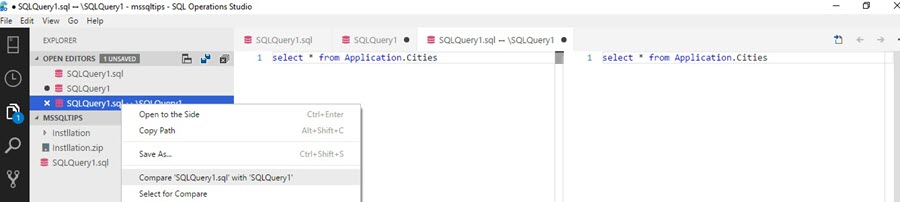
  • Open to the Side opens the file in split screen, so we can compare two files side by side.
Microsoft SQL Operations Studio compare files
  • Search: The Search pane opens up a pane that can be used to search, or search and replace, text in the current editor window.
  • Source Control Pane: This allows us to manage various files within your source code control system.
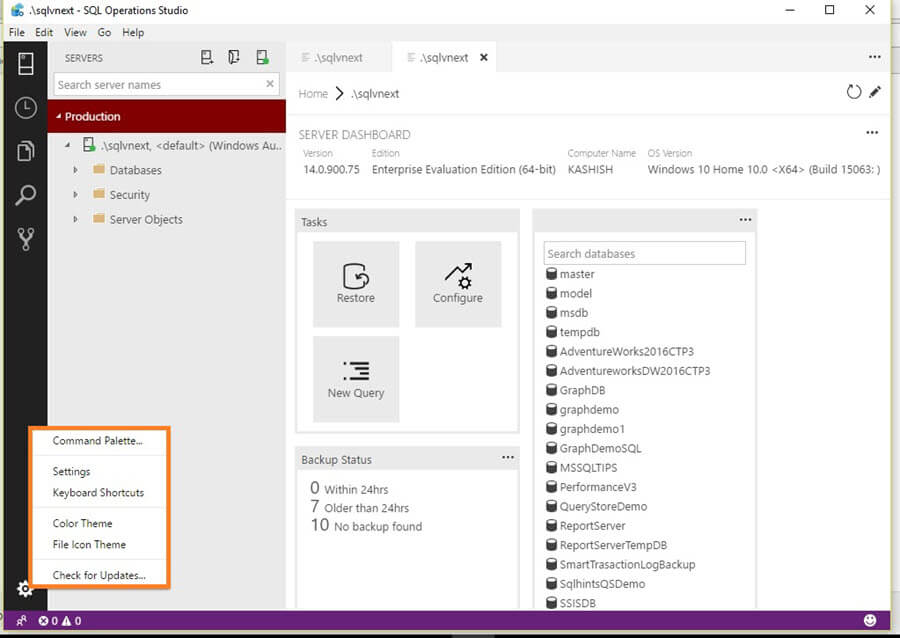
  • Settings: In the bottom lower side, we can get a setting menu. If we click on that, we get various interesting options.
Microsoft SQL Operations Studio Settings
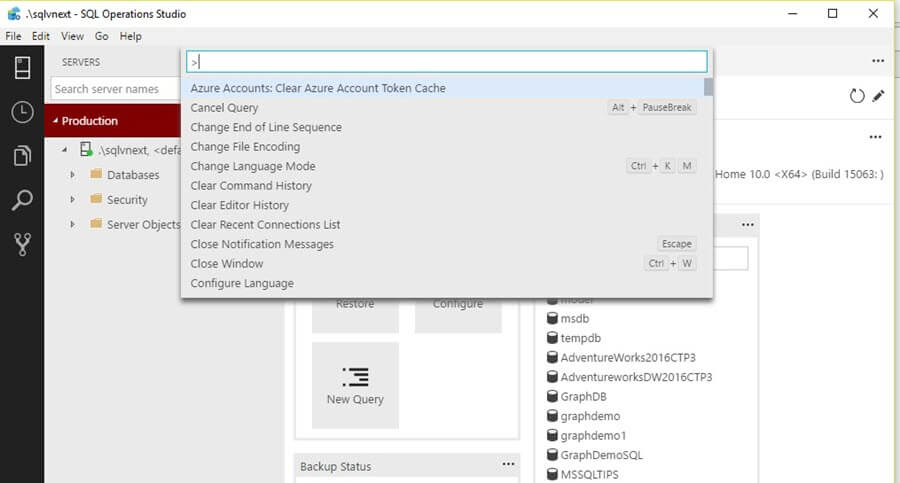
  • Command Palette: We get multiple options out of command palette to ease our tasks.
Microsoft SQL Operations Studio Command Palette
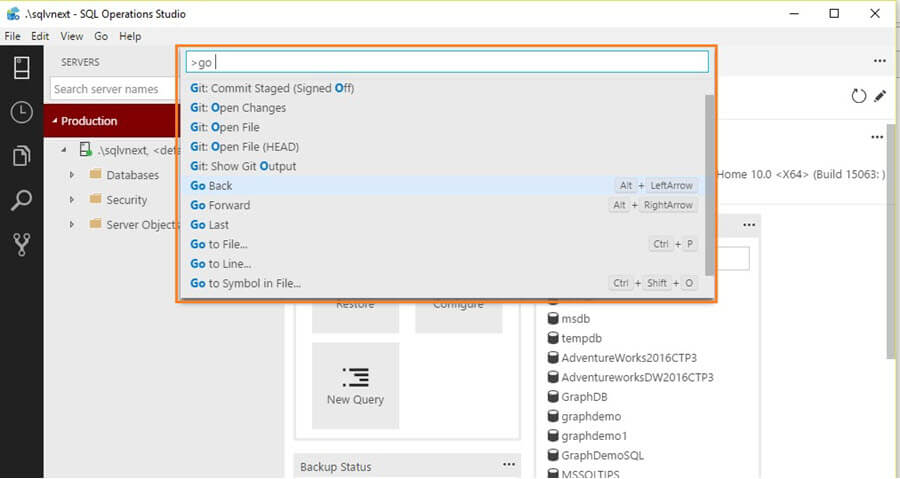
  • It has inline search functionality, as soon as we type, it gives suggestions to choose from.
Microsoft SQL Operations Studio Command Palette search
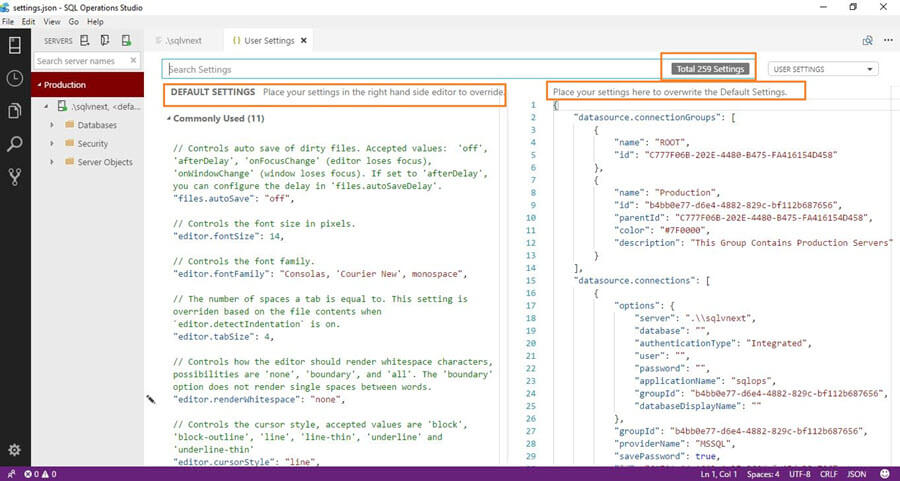
  • Settings: Once we click on the Settings option, it provides a JSON editor with two screens: one for the default settings and another to override the default settings.
Microsoft SQL Operations Studio settings
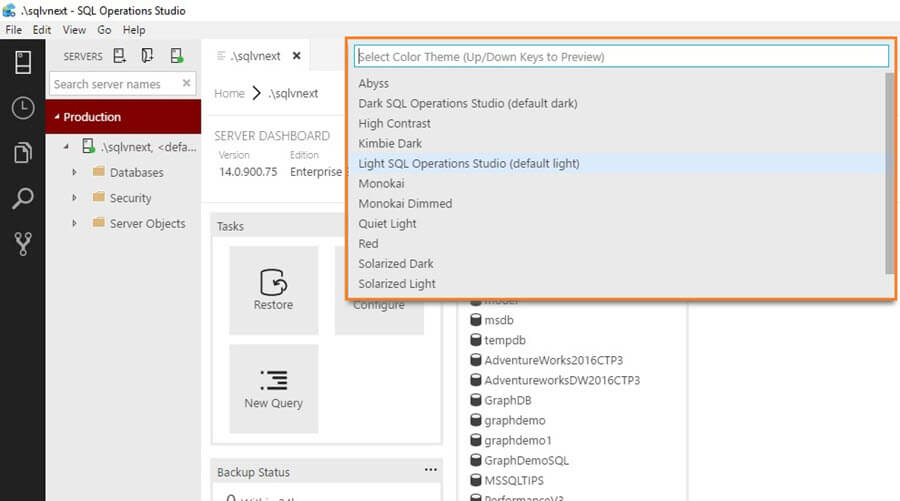
  • Color theme: SQL Operations Studio has many more available color themes to choose from. Once we click on a color theme, it gives color theme options as:
Microsoft SQL Operations Studio color theme options
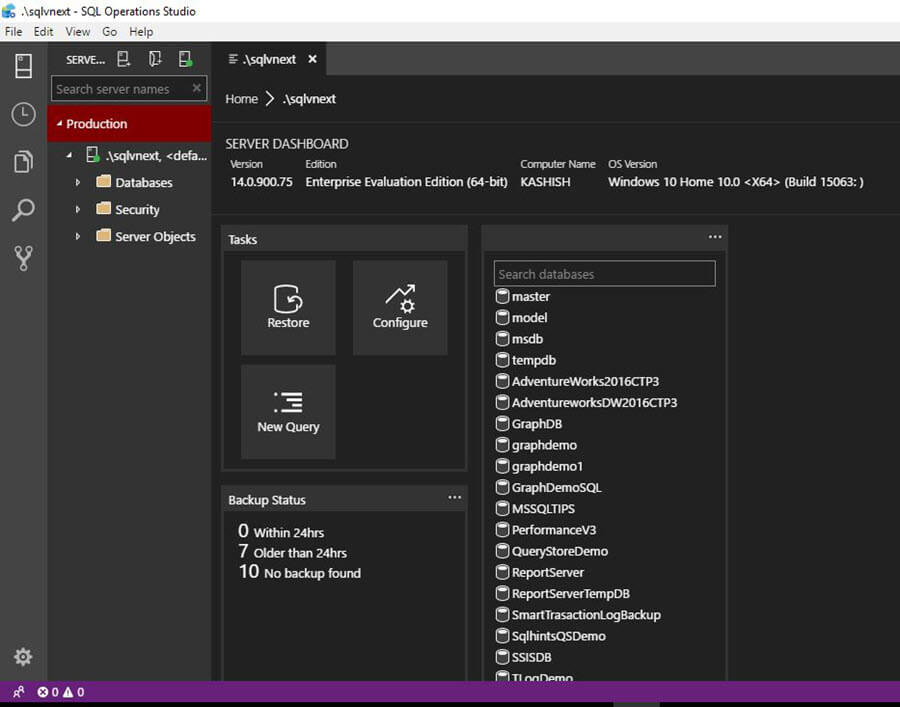
We can simply select the color theme and it immediately changes to that particular color theme.
Microsoft SQL Operations color theme layout
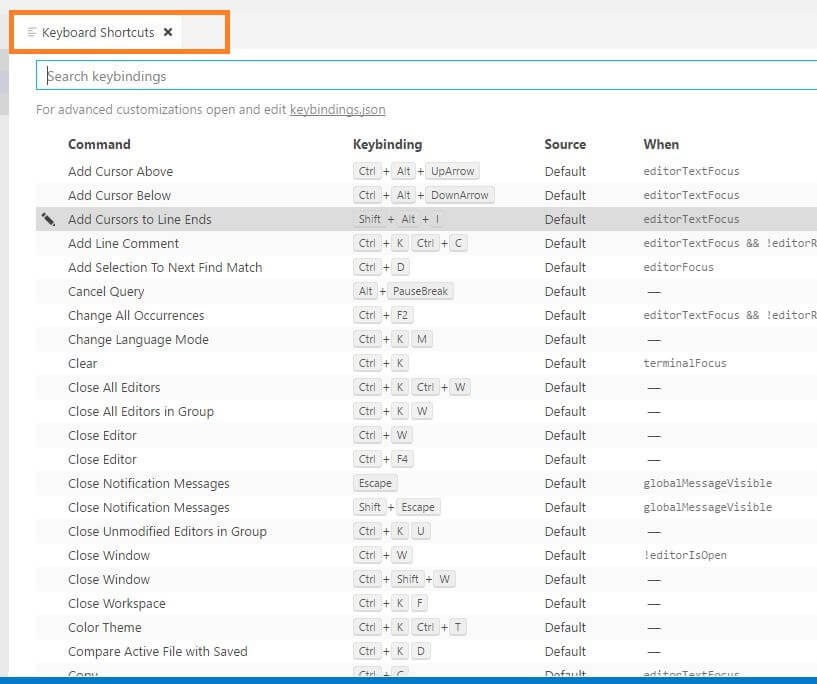
  • Keyboard shortcuts: We can get list of all keyboard shortcuts after click on this option.
Microsoft SQL Operations Studio Keyboard shortcuts
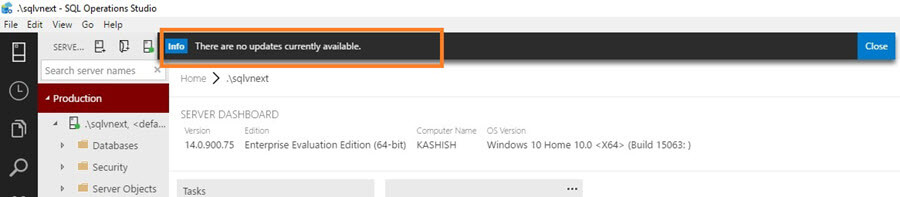
  • Checking for updates: If an update is available for SQL Operations Studio, it will show that update so that we can apply it to use the latest version.
Microsoft SQL Operations Studio updates

Summary

Currently, SQL Operations Studio is released as a Preview version. The tool is very useful and contains many interesting features. We will explore further on the SQL Operations Studio options such as executing a query, exploring execution plans, monitoring dashboards, etc. in future tips.

Friday, April 13, 2018

space used by tables

create table #TableSize (
    Name varchar(255),
    [rows] int,
    reserved varchar(255),
    data varchar(255),
    index_size varchar(255),
    unused varchar(255))
create table #ConvertedSizes (
    Name varchar(255),
    [rows] int,
    reservedKb int,
    dataKb int,
    reservedIndexSize int,
    reservedUnused int)

EXEC sp_MSforeachtable @command1="insert into #TableSize
EXEC sp_spaceused '?'"
insert into #ConvertedSizes (Name, [rows], reservedKb, dataKb, reservedIndexSize, reservedUnused)
select name, [rows],
SUBSTRING(reserved, 0, LEN(reserved)-2),
SUBSTRING(data, 0, LEN(data)-2),
SUBSTRING(index_size, 0, LEN(index_size)-2),
SUBSTRING(unused, 0, LEN(unused)-2)
from #TableSize

select * from #ConvertedSizes
order by reservedKb desc

drop table #TableSize
drop table #ConvertedSizes

or simply:

DECLARE @SpaceUsed TABLE( TableName VARCHAR(100)
      ,No_Of_Rows BIGINT
      ,ReservedSpace VARCHAR(15)
      ,DataSpace VARCHAR(15)
      ,Index_Size VARCHAR(15)
      ,UnUsed_Space VARCHAR(15)
      )
insert into @spaceused exec sp_MSForEachTable 'exec sp_spaceused [?]'
select * from @spaceused order by No_Of_Rows desc

Friday, February 23, 2018

Missing Index Script, Unused Index Scripts, Find Statistics of Whole Database, SQL Wait Statistics

Dear Friend,

In this email we will check out a few of the critical scripts related to performance tuning. You can DO IT YOURSELF.

If you face any issue or have further questions AFTER you have followed Steps listed in this email, you can always reply to this email. I read every single email and reply every single email in 24 hours. 

In this very first email we will see a few of the very important scripts related to SQL Server Indexes.

Note: Please try this on your development environment first before you execute them on your production database. Always take database backup before you change anything.
 

Step 1: Index and Statistics

1) Missing Index Scripts

Performance is often associated with Indexes. If your database is missing many indexes, you may want to execute a script from the following blog and create necessary missing indexes for your database tables. 
Missing Index Script


2) Unused Index Scripts

If you have unused indexes in your database, they will do more harm than helping your database. It is a good idea to remove them from your database. You may want to execute a script from the following blog and remove unnecessary indexes from your database tables. 
Unused Index Script


3) Find Statistics of Whole Database

Database statistics help SQL Server Engine to make appropriate decisions to use indexes. It is critical to understand the health of your statistics and script mentioned in the blog post displays all the details about your database statistics. 
Statistics Detail Script


Step 2: SQL Wait Statistics

If you want to improve performance of your SQL Server, it is critical to understand where is the performance bottleneck. I have written an entire month long series on the SQL Wait Statistics. With the help of SQL Wait Statistics, we can identify the performance bottleneck of the SQL Server. 
Identify SQL Wait Statistics

Once you identify the performance bottleneck with the above script, you can quickly search in the series of blog post and fix the issue by removing the bottleneck.


Step 3: Reply to This Email

Well,  if you have followed all the instructions so far, you should be able to fix your performance issues. If due to any reason, you need more help or want to talk to me, just hit reply to this email with your questions. Remember, I read every single email and reply within in 24 hours. Do not forget to include the result of above two steps in the excel along with your email. 
 

Professional Consultation

If you need further help you can take my professional help as well.

Comprehensive Database Performance Health Check
One stop solution for your SQL Server Performance Problems. 

SQL Server Performance Tuning Practical Workshop
No PPT, No Boring Theory – Just 100% Real World Scenario based DEMONSTRATIONS.
 
Thanks for reading it! 

Have a great day! 
~ Pinal from SQLAuthority

Monday, April 24, 2017

Find week with in month

declare @startdate date = '2017-04-30'
select cast(datename(week,@startdate) as int)- cast( datename(week,dateadd(dd,1-day(@startdate),@startdate)) as int)+1

Wednesday, March 22, 2017

macro to set cell background color

Sub RoundToZero1()
    For Counter = 1 To 300
        For Col = 1 To 50
            Set curCell = Worksheets("Assets").Cells(Counter, Col)
            If curCell.Interior.Color = 12639228 Then  'RGB(252, 219, 192) Then
                curCell.Interior.Color = RGB(210, 231, 197)
            End If
            If curCell.Interior.Color = 2327285 Then  'RGB(252, 219, 192) Then
                curCell.Interior.Color = RGB(96, 148, 61)
            End If
            'If Abs(curCell.Value) < 0.01 Then curCell.Value = 0
        Next Col
    Next Counter
    For Counter = 1 To 300
        For Col = 1 To 50
            Set curCell = Worksheets("Liabilities").Cells(Counter, Col)
            If curCell.Interior.Color = 12639228 Then  'RGB(252, 219, 192) Then
                curCell.Interior.Color = RGB(210, 231, 197)
            End If
            If curCell.Interior.Color = 2327285 Then  'RGB(252, 219, 192) Then
                curCell.Interior.Color = RGB(96, 148, 61)
            End If
            'If Abs(curCell.Value) < 0.01 Then curCell.Value = 0
        Next Col
    Next Counter
    For Counter = 1 To 300
        For Col = 1 To 50
            Set curCell = Worksheets("IncomeStatement").Cells(Counter, Col)
            If curCell.Interior.Color = 12639228 Then  'RGB(252, 219, 192) Then
                curCell.Interior.Color = RGB(210, 231, 197)
            End If
            If curCell.Interior.Color = 2327285 Then  'RGB(252, 219, 192) Then
                curCell.Interior.Color = RGB(96, 148, 61)
            End If
            'If Abs(curCell.Value) < 0.01 Then curCell.Value = 0
        Next Col
    Next Counter
    For Counter = 1 To 300
        For Col = 1 To 50
            Set curCell = Worksheets("Expenses").Cells(Counter, Col)
            If curCell.Interior.Color = 12639228 Then  'RGB(252, 219, 192) Then
                curCell.Interior.Color = RGB(210, 231, 197)
            End If
            If curCell.Interior.Color = 2327285 Then  'RGB(252, 219, 192) Then
                curCell.Interior.Color = RGB(96, 148, 61)
            End If
            'If Abs(curCell.Value) < 0.01 Then curCell.Value = 0
        Next Col
    Next Counter
    For Counter = 1 To 300
        For Col = 1 To 50
            Set curCell = Worksheets("IncomeDeductions").Cells(Counter, Col)
            If curCell.Interior.Color = 12639228 Then  'RGB(252, 219, 192) Then
                curCell.Interior.Color = RGB(210, 231, 197)
            End If
            If curCell.Interior.Color = 2327285 Then  'RGB(252, 219, 192) Then
                curCell.Interior.Color = RGB(96, 148, 61)
            End If
            'If Abs(curCell.Value) < 0.01 Then curCell.Value = 0
        Next Col
    Next Counter
    For Counter = 1 To 300
        For Col = 1 To 50
            Set curCell = Worksheets("TurnoverRatios").Cells(Counter, Col)
            If curCell.Interior.Color = 12639228 Then  'RGB(252, 219, 192) Then
                curCell.Interior.Color = RGB(210, 231, 197)
            End If
            If curCell.Interior.Color = 2327285 Then  'RGB(252, 219, 192) Then
                curCell.Interior.Color = RGB(96, 148, 61)
            End If
            'If Abs(curCell.Value) < 0.01 Then curCell.Value = 0
        Next Col
    Next Counter
    For Counter = 1 To 300
        For Col = 1 To 50
            Set curCell = Worksheets("EquipmentDetailUsed").Cells(Counter, Col)
            If curCell.Interior.Color = 12639228 Then  'RGB(252, 219, 192) Then
                curCell.Interior.Color = RGB(210, 231, 197)
            End If
            If curCell.Interior.Color = 2327285 Then  'RGB(252, 219, 192) Then
                curCell.Interior.Color = RGB(96, 148, 61)
            End If
            'If Abs(curCell.Value) < 0.01 Then curCell.Value = 0
        Next Col
    Next Counter

    MsgBox "Completed"
End Sub


Friday, March 17, 2017

Macro to List All Formulas in Workbook

http://blog.contextures.com/archives/2012/09/27/list-all-formulas-in-workbook/
List All Formulas in Workbook

If you’re working on a complicated Excel file, or taking over a file that someone else built, it can be difficult to understand how it all fits together.
formulalist03 
To get started, you can see where the formulas and constants are located, and colour code those cells.
Copy of formatformulas09 

View Formulas on the Worksheet

You can also view the formulas on a worksheet, by using the Ctrl + ` shortcut. And if you open another window in the workbook, you can view formulas and results at the same time.
FormulaView03

Code to List Formulas

For more details on how the calculations work, you can use programming to create a list of all the formulas on each worksheet.
In the following sample code, a new sheet is created for each worksheet that contains formulas. The new sheet is named for the original sheet, with the prefix "F_".
In the formula list sheet, there is an ID column, that you can use to restore the list to its original order, after you’ve sorted by another column.
There are also columns with the worksheet name, the formula’s cell, the formula and the formula in R1C1 format.
formulalist02 
Copy the following code to a regular module in your workbook.
Sub ListAllFormulas()
'print the formulas in the active workbook
Dim lRow As Long
Dim wb As Workbook
Dim ws As Worksheet
Dim wsNew As Worksheet
Dim c As Range
Dim rngF As Range
Dim strNew As String
Dim strSh As String
On Error Resume Next
Application.DisplayAlerts = False

Set wb = ActiveWorkbook
strSh = "F_"

For Each ws In wb.Worksheets
  lRow = 2
  
  If Left(ws.Name, Len(strSh)) <> strSh Then
    Set rngF = Nothing
    On Error Resume Next
    Set rngF = ws.Cells.SpecialCells(xlCellTypeFormulas, 23)
    If Not rngF Is Nothing Then
      strNew = Left(strSh & ws.Name, 30)
      Worksheets(strNew).Delete
      Set wsNew = Worksheets.Add
      With wsNew
        .Name = strNew
        .Columns("A:E").NumberFormat = "@" 'text format
        .Range(.Cells(1, 1), .Cells(1, 5)).Value _
            = Array("ID", "Sheet", "Cell", "Formula", "Formula R1C1")
        For Each c In rngF
          .Range(.Cells(lRow, 1), .Cells(lRow, 5)).Value _
            = Array(lRow - 1, ws.Name, c.Address(0, 0), _
              c.Formula, c.FormulaR1C1)
          lRow = lRow + 1
        Next c
        .Rows(1).Font.Bold = True
        .Columns("A:E").EntireColumn.AutoFit
      End With 'wsNew
      Set wsNew = Nothing
    End If
  
  End If
Next ws
  
Application.DisplayAlerts = True

End Sub

Code to Remove Formula Sheets

In the List Formulas code, formula sheets are deleted, before creating a new formula sheet. However, if you want to delete the formula sheets without creating a new set, you can run the following code.
Sub ClearFormulaSheets()
'remove formula sheets created by
'ShowFormulas macro
Dim wb As Workbook
Dim ws As Worksheet
Dim strSh As String
On Error Resume Next
Application.DisplayAlerts = False

Set wb = ActiveWorkbook
strSh = "F_"

Set wb = ActiveWorkbook
  For Each ws In wb.Worksheets
    If Left(ws.Name, Len(strSh)) = strSh Then
      ws.Delete
    End If
  Next ws
  
Application.DisplayAlerts = True

End Sub

Wednesday, March 8, 2017

Query to Display Foreign Key Relationships and Name of the Constraint for Each Table in Database

https://blog.sqlauthority.com/2006/11/01/sql-server-query-to-display-foreign-key-relationships-and-name-of-the-constraint-for-each-table-in-database/

SELECTK_Table = FK.TABLE_NAME,FK_Column = CU.COLUMN_NAME,PK_Table = PK.TABLE_NAME,PK_Column = PT.COLUMN_NAME,Constraint_Name = C.CONSTRAINT_NAMEFROM INFORMATION_SCHEMA.REFERENTIAL_CONSTRAINTS CINNER JOIN INFORMATION_SCHEMA.TABLE_CONSTRAINTS FK ON C.CONSTRAINT_NAME = FK.CONSTRAINT_NAMEINNER JOIN INFORMATION_SCHEMA.TABLE_CONSTRAINTS PK ON C.UNIQUE_CONSTRAINT_NAME = PK.CONSTRAINT_NAMEINNER JOIN INFORMATION_SCHEMA.KEY_COLUMN_USAGE CU ON C.CONSTRAINT_NAME = CU.CONSTRAINT_NAMEINNER JOIN (SELECT i1.TABLE_NAME, i2.COLUMN_NAMEFROM INFORMATION_SCHEMA.TABLE_CONSTRAINTS i1INNER JOIN INFORMATION_SCHEMA.KEY_COLUMN_USAGE i2 ON i1.CONSTRAINT_NAME = i2.CONSTRAINT_NAMEWHERE i1.CONSTRAINT_TYPE = 'PRIMARY KEY') PT ON PT.TABLE_NAME = PK.TABLE_NAME---- optional:ORDER BY1,2,3,4WHERE PK.TABLE_NAME='something'WHERE FK.TABLE_NAME='something'WHERE PK.TABLE_NAME IN ('one_thing', 'another')WHERE FK.TABLE_NAME IN ('one_thing', 'another')